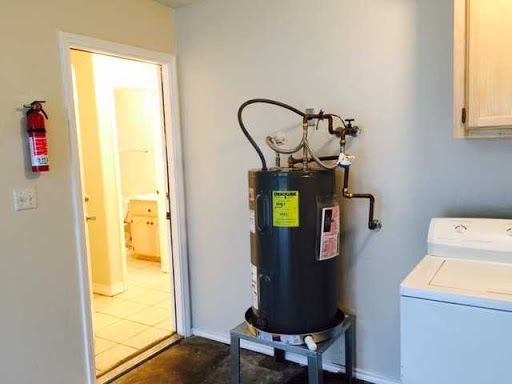
Water Heater Installation
Let me think, you decreased staircases to inspect the washing or get hold of a tool as well as their it was. A substantial pool of water around your cellar flooring as well as it is coming from the bottom of the hot water heater. This is the apparent and also most usual sign you need a new water heater setup.
If you have any type of experience with Do It Yourself tasks around your home setting up a brand-new water heater must not be a problem for you. Adhere to along with the action in this write-up and you will certainly have your new hot water heater installed in a couple of hrs. Mounting a hot water heater on your own will certainly conserve you up to 300 or 400 dollars depending on the location you reside in. Now if you are not very DIY you can still install your very own water storage tank, nevertheless it may take a little longer than a couple of hours yet if you like a challenge and are not afraid doing repair work on your home you will certainly be able to set up the heater on your own as well.
Devices As Well As Products You Will Certainly Need:
Water Heater- Install what you are taking out if you have a 40 gallon and wish to update to a 50 gallon currently is the moment to do it. If you do have a 50 gallon I DO NOT advise changing to anything less than what you have.
3/4 Fittings – You will require 2 3/4 couplings and potentially some elbows. Check what kind of pipeline you have going to your hot water heater. This can be copper, CPVC, PEX or galvanized. I suggest getting Shark Attack 3/4 installations due to the fact that they are very simple to mount with PEX, CPVC and copper piping. When you have galvanized pipe you might require to get a conversion suitable as well as adapt to among the various other pipelines for less complicated installment.
Black Pipeline Fittings – You may need a few 1/2 black pipe couplings as well as elbows to expand or shorten the gas line attaching to the heater. I set up the gas line last. By doing this I will certainly know precisely what I require for gas installations.
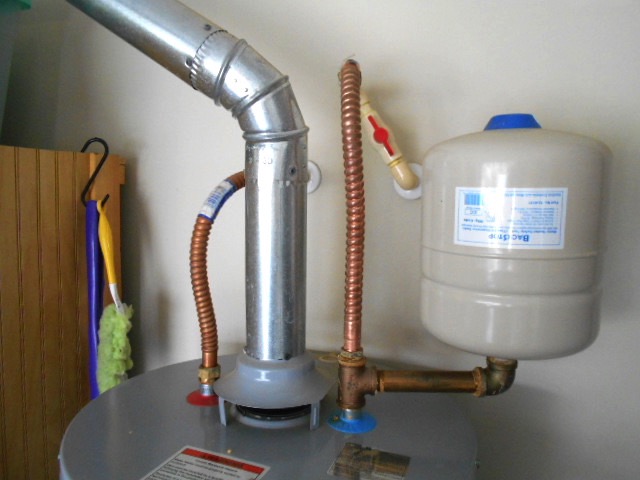
2 – 3/4 dielectrics. Constantly change the dielectrics when installing a brand-new water heater. Make certain you get the correct dielectrics for the piping product you have in your residence.
T&P Valve usually includes the new heaters.
Lantern, Flux, Solder, sand paper
Channel Locks or balanced out pliers
Pipe Wrench
Pipe String solution or Teflon tape
Yard hose pipe.
Now that we have all of our materials allow’s get started. The primary step is to shut off the primary water system to house. Following Turn off the gas vale on the gas line going to the water heater. Now link the yard tube to the bottom of the water heater as well as run the hose to neighboring flooring drain. Switch on the valve (this looks like an outdoors hose pipe bib) and allow the heating system beginning to drain.
Currently go throughout your home as well as turn on every one of the taps. Ensure you leave the taps in the on placement as well as you have hot and cold water turned on. This will enable all of the water to drain pipes out of the heating system a whole lot faster.
While the water is draining pipes out of the old heating system, Unbox the brand-new water heater. First pipe dope the two shafts appearing the top of the heating unit. Once they are doped screw on the new dielectrics. Following if your heating unit featured a T&P shutoff unpacks it as well as pipeline dope those threads. Screw the T&P valve right into the side of the heater there will certainly be a hole with strings on it where it goes. You might need to utilize your pipe wrench to get that last turn on so the shutoff points down. Now you obtained the heating unit prepped as well as ready to go and read more plumbing service tips.
As soon as the old heating system is done draining detach the gas pipe at the union fitting. This is the fitting which has a hexagonal center. Once the union is detached disconnect the rest of the pipeline ONLY on the heater you are replacing.
Now we will certainly disconnect the pipes. Utilize your channel locks to detach the dielectric. They will certainly disconnect similar to the gas pipeline union fittings. Cut off the old dielectrics from the copper or various other piping you may have.
As soon as every one of the pipelines are detached from the hot water heater and it does not look like there is anymore water in the container start to eliminate the old water heater out of the way. Ensure you leave sufficient space to obtain the new heater in position. If you have a tiny location you may have to just eliminate the old water heater to make room for the brand-new hot water heater.
Line up the new water heater with the pipes that attached the old heating unit. If you observe you need transform some water piping, leave the pipe with the cold water shutoff the straight pipeline and also reconfigure the warm side.
Connect the water piping to brand-new heating system using the shark bite installations or whatever fittings you selected. You might have to solder the new dielectrics to the water piping if you have copper pipeline. When soldering the dielectrics I advise you figure out just how much pipe you need from the dielectric to the coupling and also cut it to length and also solder it on the ground. This will certainly make for a simpler solder job. You will certainly additionally intend to take out the washers from the dielectrics so you don’t melt them.
Currently you have the water pipe all attached. As soon as whatever cools. If you had to do any soldering. Change the washers in the dielectrics as well as tighten them down. Activate the primary water. While the water heater is filling out leave the faucets on so you can hemorrhage every one of the air out of the system.
Now you will recognize what you require for gas pipeline. Link the gas pipe to the heating unit. If you are fortunate the gas pipeline from the old heating unit will line up with the brand-new heating unit. If it does not, just reconfigure it as required. You can get gas piping in all arrays and dimensions.